Debug CSS Flexbox Visually: An Online HTML Editor Guide
Are you tired of wrestling with CSS Flexbox layouts that just won't cooperate? Tweaking justify-content for the tenth time only to see your items fly to the wrong side of the screen is a frustration every developer knows. But what if you could see your changes in real time, making layout debugging less of a guessing game and more of an intuitive, visual process? How do I view the html code of a website and its corresponding styles without a complex setup? The answer lies in using a powerful online html editor. This guide will show you how to visually identify, troubleshoot, and fix common Flexbox problems using a streamlined, browser-based tool.
With the right approach, you can transform your CSS workflow from frustrating to efficient. An interactive editor allows you to experiment with properties and receive instant visual feedback, accelerating both learning and development. Let's dive into how you can make this powerful technique a core part of your coding toolkit with a free HTML viewer.

Understanding Common Flexbox Alignment Issues
Before we jump into the solution, it's crucial to understand the root of most Flexbox frustrations. Many layout problems stem from a few core properties that are often misunderstood. By mastering these, you'll be able to diagnose issues far more quickly. A good visual css editor can make these concepts click by showing you exactly what happens when you adjust them.
Why Your Flex Items Aren't Aligning: justify-content vs. align-items
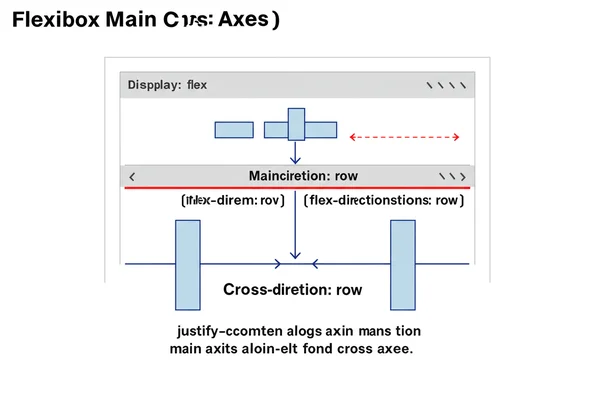
One of the most frequent points of confusion is the difference between justify-content and align-items. Both are essential for alignment, but they operate on different axes. Mastering their interaction is key to controlling your layout.
justify-content: This property aligns flex items along the main axis. If yourflex-directionisrow(the default), the main axis is horizontal. If it'scolumn, the main axis is vertical.align-items: This property aligns flex items along the cross axis. If the main axis is horizontal, the cross axis is vertical, and vice versa.
A common mistake is trying to use justify-content for vertical alignment in a default row direction. The instant you can toggle these flexbox properties in a live editor, their relationship becomes crystal clear.
Troubleshooting Spacing and Gutter Problems in Flexbox
Getting items to space out evenly is another challenge. You might use justify-content: space-between, but then find your first and last items are flush against the container edges, which isn't always desired. Modern Flexbox offers the gap property, which simplifies this process immensely.
Previously, developers relied on adding margins to flex items, which could be cumbersome, especially when dealing with wrapping elements. The gap property applies consistent spacing only between items, not between items and the container edge. Visually debugging these spacing issues in an online tool helps you instantly see whether you need gap, margin, or a combination of justify-content values to achieve the perfect layout.
Overcoming flex-direction Misconceptions and Their Visual Impact
Changing the flex-direction from row to column fundamentally alters how your layout behaves. It swaps the main and cross axes, meaning justify-content now controls vertical alignment and align-items controls horizontal alignment.
This switch can be disorienting, as the mental model for your layout has to flip. This is where a real-time preview shines. By changing flex-direction in a code editor and immediately seeing the visual impact, you can build a stronger intuition for how Flexbox operates in different orientations, solidifying your understanding without the frustration of trial and error in a static environment.
Your Visual CSS Editor Workflow for Debugging Flexbox
Now that we've covered the common culprits, let's establish a practical workflow using an online tool. An effective css debugging tool should be fast, intuitive, and require zero setup. This is where HtmlViewer.cc excels, providing a sandbox environment to test code snippets instantly.
Setting Up Your Code in HtmlViewer.cc for Live Preview
Getting started is incredibly simple. You don't need to create files, set up a local server, or open a bulky IDE. Just follow these steps:
- Navigate to the online editor.
- Paste your HTML structure into the left-hand editor panel.
- Add your CSS, including your Flexbox rules, within a
<style>tag in your HTML. - As you type, the right-hand panel instantly renders your code.
This immediate live preview creates a direct link between your code and the visual output, forming the foundation of an efficient debugging process. You can isolate the problematic component and work on it without any other distractions.
Inspecting Flexbox Properties with Real-time Feedback
With your code loaded, the real magic begins. Instead of changing a CSS value in your code editor, saving the file, and refreshing your browser, you can make adjustments directly in the editor and see the result instantly.
Is align-items: center not working as expected? Try changing it to stretch or flex-start. You'll get real-time feedback that immediately confirms or denies your hypothesis. This rapid iteration cycle reduces the time spent on debugging from minutes to seconds. It’s the closest you can get to physically manipulating the elements on your screen.
Iterative Adjustments: Editing CSS Live and Seeing Instant Results
This workflow encourages experimentation. You can freely tweak values for flex-grow, flex-shrink, and flex-basis to understand how they affect item sizing. Seeing the changes as you type helps build muscle memory and a deeper comprehension of Flexbox mechanics.
For example, you can incrementally increase the gap value to find the perfect spacing or cycle through justify-content options to choose the best alignment for your design. This process of editing css live makes debugging feel less like a chore and more like a creative exploration. When you are done, you can use the beautify or minify functions to clean up your code before downloading it.
Advanced Tips & Practical CSS Debugging Tools
While a live editor is fantastic for rapid iteration, it’s also important to know how it fits into your broader toolkit. Combining its strengths with other methods will make you an even more effective developer.
Beyond the Basics: Nested Flexbox and Complex Layouts
Flexbox truly shines when you start nesting containers to build complex layouts. However, this is also where debugging can become tricky. A parent's Flexbox properties don't directly affect a grandchild element.
Using an interactive HTML tool helps you isolate each flex container. You can focus on getting one container right, then move to the next, building up your layout piece by piece. This methodical approach prevents you from getting overwhelmed by the complexity of a deeply nested structure.
When to Use Online Editors vs. Browser Dev Tools for CSS
So, should an online editor replace your browser's developer tools? Not entirely. They serve different but complementary purposes.
- Browser Dev Tools are unmatched for inspecting a live, complex website. They let you see the final, computed CSS, understand how different stylesheets interact, and debug issues in the context of the entire application.
- An Online Editor like Html Viewer is your perfect sandbox. It’s ideal for isolating a specific component, testing a new CSS feature, creating a quick prototype, or sharing a code snippet with a colleague to demonstrate an issue. It excels at rapid, focused experimentation without the noise of a full application.
Think of the visual debugging tool as your workshop for building and perfecting individual parts, and Dev Tools as your on-site toolkit for inspecting the final construction.
Unlock Faster Flexbox Debugging with Html Viewer
Tired of the Flexbox fight? Html Viewer empowers you to see your CSS come to life instantly. Our visual, real-time workflow demystifies Flexbox properties, letting you fix alignment issues in seconds and build complex layouts with unwavering confidence. Say goodbye to traditional setup friction and focus purely on your code's visual impact.
Ready to transform your debugging process? Head over to Html Viewer to paste your code and experience the power of instant feedback. It’s free, requires no setup, and will quickly become an indispensable part of your development toolkit.

Frequently Asked Questions About Flexbox Debugging
How do I visually debug CSS Flexbox effectively using an online tool?
The most effective way is to use an online tool with a live preview pane. Paste your HTML and CSS into the editor. As you modify Flexbox properties like justify-content, align-items, or gap, watch the preview panel update in real time. This immediate feedback loop allows you to instantly see the effect of each change, making the debugging process intuitive and fast.
What are the most common flexbox alignment issues beginners face?
The most common issues are confusing the main and cross axes and misusing justify-content and align-items. Beginners often try to use justify-content for vertical alignment when the flex-direction is row. Another frequent problem is dealing with spacing, where using margins can cause issues that the modern gap property solves more elegantly.
Can an online html editor fully replace browser developer tools for CSS debugging?
No, but it serves a different, crucial purpose. Browser DevTools are essential for inspecting live, production websites and understanding the full cascade of styles. An online editor is a "sandbox" environment, perfect for isolating code snippets, rapid prototyping, learning new properties, and sharing examples without the overhead of a full project setup. They work best together. You can try our tool today to see how it complements your workflow.
How can I share my Flexbox code and its visual output with others?
Most online HTML editors make this easy. Once you have your code working perfectly in a tool like Html Viewer, you can simply use the "Copy" button to grab the formatted code and send it to a colleague. They can then paste it into the same tool to see the exact same visual result you do, streamlining collaboration and problem-solving.